Steps to Integrate Three JS Scene in Angular


You may know the popularity of online gaming in modern time. You will be surprised to know that the global marketing for online gaming has exceeded its revenue of $100 Billion. Yes this is how the market of online gaming is growing up rapidly worldwide. With its increasing popularity, it is obvious that online gaming is undergoing through a phase of rapid improvement. For example, now online gaming industries are using powerful 2D and 3D gaming engines instead of using Flash or Java.
So if you are in the field of developing online gaming, it is important to create animated 3D computer graphic which is now in trend. Here comes the importance of Three JS scene, which offers a wide range of features for creating and displaying exclusive 3D computer graphics efficiently without any complexity of WebGL low-level API.
The Technical Steps for Integrating Three JS Scene in Angular:

As a web developer if you work with Angular, it is obvious that you must need to know how to integrate Three JS Scene in Angular which will help you to build GPU-enhanced 3D animations by using the rich features of JavaScript language. The steps include:
-
Step.1 Install Angular CLI:
To create Angular project, the first thing that you need to do is to install Angular CLI, by typing npm install-g @angular/cli

-
Step.2 Create Angular Project:
Now create your angular project by typing ng new angular-three in the terminal.

-
Step 3. Install three.js:
After you install CLI successfully, now install three.js as a dependency by typing the command- cd angular-three
-
Step 4:
You can install three.js packages by using command as-npm install three-save
-
Step 5:
You can install the type definitions of three,js by typing- npm install @types/three-save-dev
-
Step 6: Install Typescript File:
Thus you will be able to create three.js, where you can render the 3D object. The next step is the typescript file (.ts) where you can import three.js functionalities and last in CSS style file. By using the below mentioned command you can generate ‘cube’ component using angular-cli
ng g component cube
-
Step 7 Integrate Three.js with Angular:
Now you need to integrate three.js with Angular by importing the three.js to the component. In this way you can render the 3D object, which is component.ts.

Import three.js at the top
Now get the reference of the canvas in the HTML file by typing:
@ViewChild(‘canvas’) private canvasRef: ElementRef:

Canvas reference in .ts file
Cube Properties:
- rotationSpeedX: rotation speed of cube on X-asis
- rotationSpeedY: rotation speed of cube on y-asis
- size: size of the cube
- texture: helps to add a texture to the cube

Cube Properties
Stage Properties:
- cameraZ: camera position on the z-asis
- fieldofview: camera field of view
- nearClippingPlane
- farClippingPlane
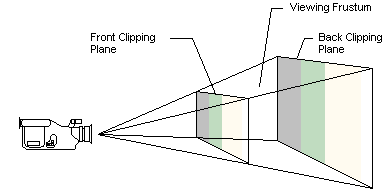
Near and far clipping plane
These are the two imaginary planes located at particular distances. Only objects that are placed between the two clipping planes of camera are rendered in the camera’s view.

Now try to create a scene by adding different elements like camera, cube etc. Lets find out the function below:

Creating the scene
Now look at the next figure which initializes a function animate Cube. This function adds cube rotation on x-axis and y-axis:

animateCube function
Now try to create a rendered function by passing the canvas element into the rendered. Then set the renderer engine pixel ratio and set its size. Then generate the animation loop by call a recursive render function.

Start the rendering loop
This is the final step where you have come to call the createScene() and startRenderingLoop() function in ngAfterViewInit () and now you are ready to start the project using the ng serve in the terminal.

Calling the scene
Conclusion:
It is recommended to write the code in such a way that you can call this cube component in any parent component. Thus you can change the parameters from the parent component.
Some frequently asked questions (FAQs):
- Where you can use three.js?
Three.js is a cros-browser JavaScript is application programming interface or API can be used to create animated 3D computer based graphics.
- Is three.js an open source?
Three.js is an open source JavaScript library, used to create 3D and 2D objects.
- Is three.js a WebGL?
Three.js is a JavaScript-based WebGL engine that is responsible to run GPU-powered games and graphics-powered apps.
- Why choose Digital Infoways for integrating three.js in Angular?
Digital Infoways can integrate three.js in Angular with their different proven strategies and techniques. It is a digital marketing company offering a wide range of digital marketing services including integrating three.js in Angular.
- How does it cost to integrate three.js in Angular?
The cost of integrating three.js in Angular depends on various factors including: techniques, strategies, hosting, planning, expertise, security, quality testing, compatibility and the agency you hire.
Must Read .